Building Dance Controlled Lights with Python
In today’s post, we’ll walk through training our very own neural network to recognize specific dance moves via a webcam.
We’ll build upon an existing deep learning model called OpenPose to detect body positions, and then build a set of examples for what each pose is.
Once we’ve built up a set of examples for what Dabs, T-Poses, and anything else looks like, we’ll clean up our dataset and train a neural network on it.
Once that network is then trained, we’ll then it to control some lights.
There’s quite a few steps to today’s post, but all the code is on Github, including the original data examples I’ve already collected.
You should be able to follow along and use my data to train your own network on your computer. So let’s get started!
Writing Software that Writes Software: How to Train Your Neural Net
Data. Usually a lot of it.
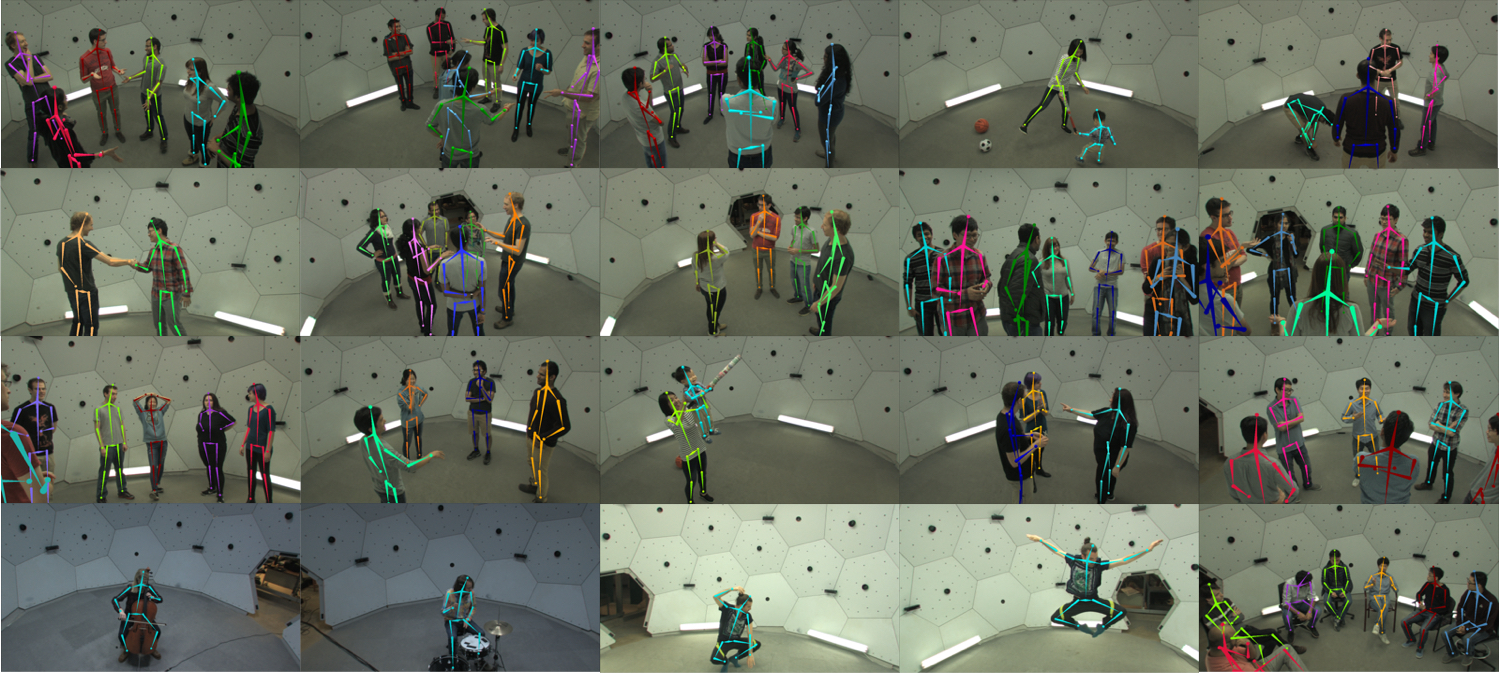
For the network that we’ll be starting from today, the team from CMU used the CMU Panoptic Dataset. It consists of five and a half hours worth of videos with 1.5 million manually added labels for where people’s skeletons are in a video.
The Panoptic studio itself is a dome with over 500 cameras, all pointed inward to record people and their motions from different angles at the same time.
It was created to make near perfect training data for computer vision experiments.
Today, we’ll build upon their (massive!) work, and use a create a much simpler dataset. Our final trained network uses only 171 recorded Dab, Tpose, or Other poses, each recorded using their existing work to extract poses.
A nice thing about neural networks in general is that you can reuse parts other people have built, and add just a few layers to extend what’s already been built. This is called transfer learning, and it’s doable with limited computational resources.
I don’t think we’ll technically be using transfer learning though, because we’ll be creating a separate neural network that takes the slightly adjusted output of OpenPose.
So, now that we know we need data, how do we get training data?
Building a Program to Collect Labeled Data with OpenCV
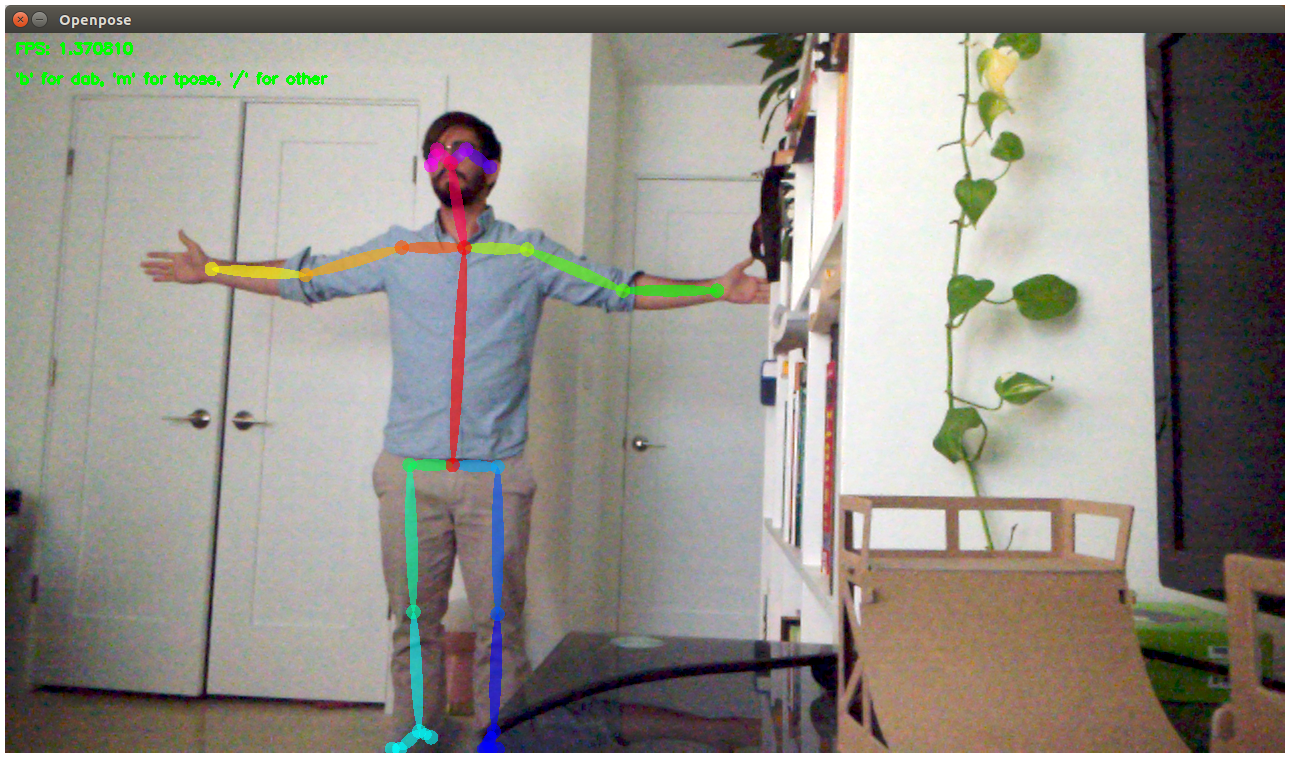
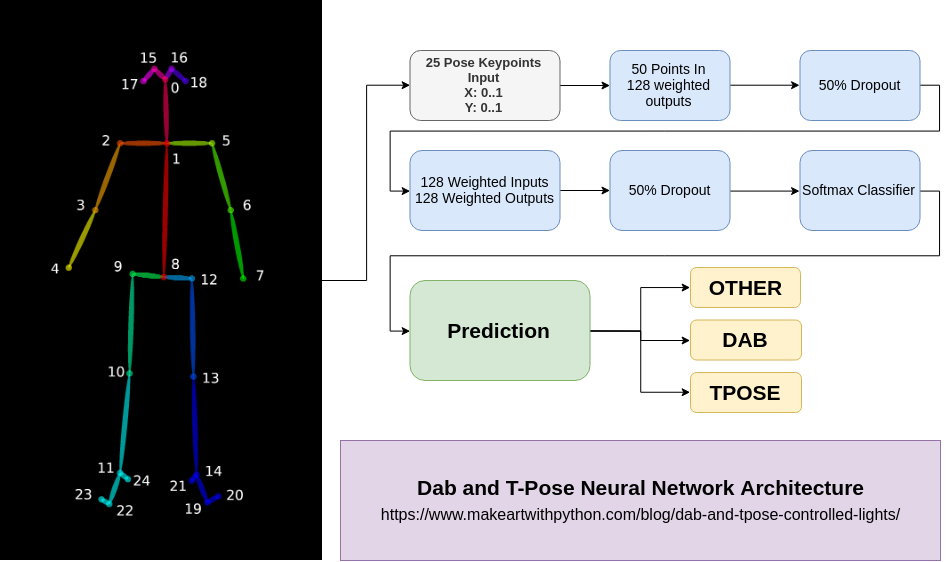
With OpenPose’s output, we have 25 labels generated for a person’s skeleton.
We can create an OpenCV program to open the webcam, run OpenPose on the image, and then wait for us to press a key on the keyboard to decide which type of pose it is.
So, we make a T-Pose, press m on our keyboard, and that pose gets added to a list of T-Poses. We do this for 171 different poses, and we have a dataset to train our neural network on.
Here’s an excerpt of what the dataset gathering code looks like:
# create lists for dab, tpose, other examples

dabs = []
tposes = []
other = []

fps_time = 0

# loop forever, reading webcam each time
while True:
    ret_val, frame = vs.read()

    datum.cvInputData = frame
    opWrapper.emplaceAndPop([datum])

    # need to be able to see what's going on
    image = datum.cvOutputData
    cv2.putText(image,
                "FPS: %f" % (1.0 / (time.time() - fps_time)),
                (10, 10),  cv2.FONT_HERSHEY_SIMPLEX, 0.5,
                (0, 255, 0), 2)

    cv2.imshow("Openpose", image)
    fps_time = time.time()

    # quit with a q keypress, b or m to save data
    key = cv2.waitKey(1) & 0xFF
    if key == ord("q"):
        break
    elif key == ord("b"):
        print("Dab: " + str(datum.poseKeypoints))
        dabs.append(datum.poseKeypoints[0])
    elif key == ord("m"):
        print("TPose: " + str(datum.poseKeypoints))
        tposes.append(datum.poseKeypoints[0])
    elif key == ord("/"):
        print("Other: " + str(datum.poseKeypoints))
        other.append(datum.poseKeypoints[0])

# write our data as numpy binary files
# for analysis later

dabs = np.asarray(dabs)
tposes = np.asarray(tposes)
other = np.asarray(other)

np.save('dabs.npy', dabs)
np.save('tposes.npy', tposes)
np.save('other.npy', other)
We use NumPy’s array saving feature np.save, to save a binary file to load and manipulate later. I like to view and manipulate data within a Jupyter notebook.
So once the data is collected, we can then view and clean up our data for better training.
Viewing, Cleaning and Training on Our Data
This seems like a lot of steps to all put in one place, but Jupyter notebooks, along with Python super tools like Numpy and Keras give us a straightforward way to observe, clean, and train a neural network on data.
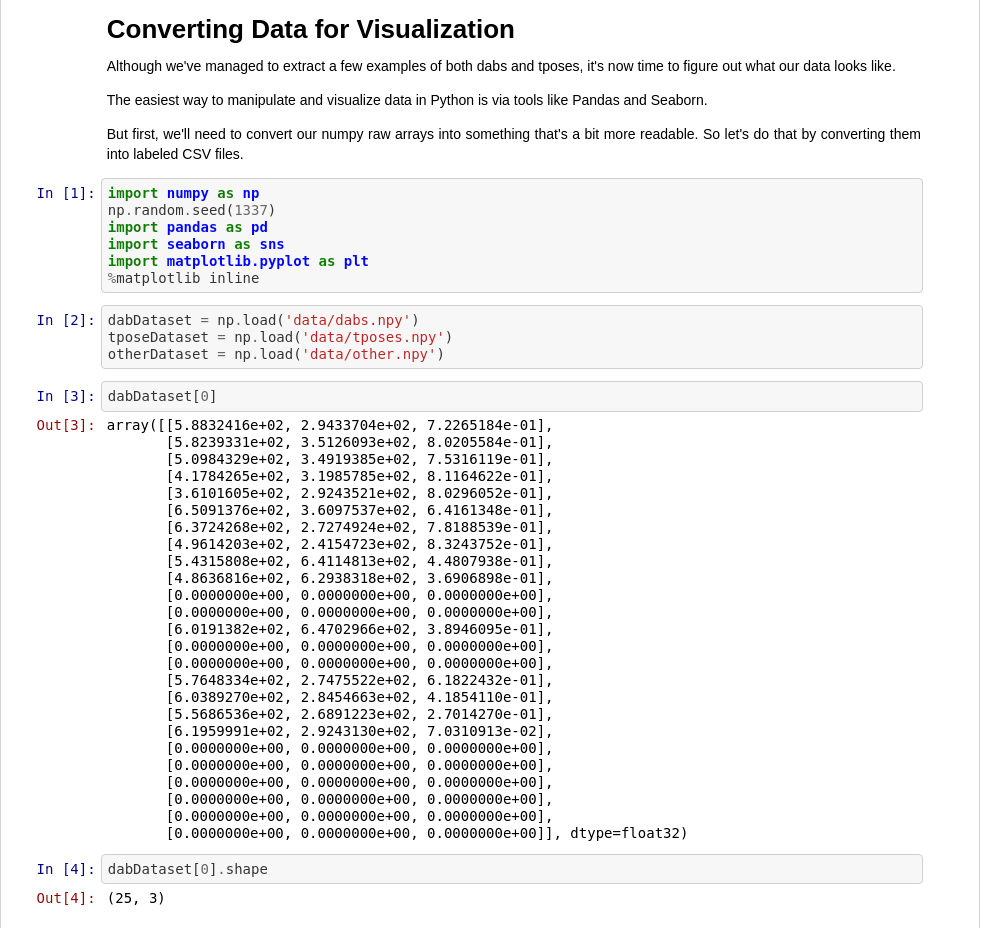
Looking at the screenshot of our notebook, we can see that the data we get out of our .npy files and the OpenPose model itself consists of 3 dimensions.
The 25 known body point position locations, as X, Y, and Confidence.
For our training, we won’t really need the confidence. If there’s a body point position that’s named, keep it. Otherwise, just leave it as zeros.
Now that we’ve got our data (mostly) sorted out, we need to convert it into a set.
We’ll use 0 for other poses, 1 for dabs, and 2 for tposes.
labels = np.zeros(len(otherDataset))
labels = np.append(labels, np.full((len(dabDataset)), 1))
labels = np.append(labels, np.full((len(tposeDataset)), 2))
print(labels)
print("%i total examples for training." % len(labels))
With this, we can then convert our numbered labels in to a “One-hot encoding”. This just means go from 0, 1, 2 to [1, 0, 0], [0, 1, 0], [0, 0, 1]. Once that’s done, we can shuffle both the labels and the training data together the same way, using sklearn’s shuffle function:
# now, let's shuffle labels and the array, the same way
from sklearn.utils import shuffle
X1, y1 = shuffle(dataset, labels)
# now let's label them for 'one hot'
from keras.utils.np_utils import to_categorical
y1 = to_categorical(y1, 3)  # we have 3 categories, dab, tpose, other
print(y1.shape[1)]
Since our input data is shaped from 0..720 and 0..1280 in pixels for where the nose, hands, etc. are, let’s reshape it so that everything works from 0..1. That way, we’ll be able to reuse our model regardless of the input resolution.
X1[:,:,0] = X1[:,:,0] / 720 # I think the dimensions are 1280 x 720 ?
X1[:,:,1] = X1[:,:,1] / 1280  # let's see?
X1 = X1[:,:,1:]
print(X1.shape)
X1 = X1.reshape(len(X1), 50)      # we got rid of confidence percentage
In the last step there, we reshaped our multidimensional array to be flat. We’ll be sending batches of the 50 places, or the X and Y for the 25 points, all normalized to between 0 and 1.
Architect and Train our Model
My favorite feature of working with Keras in a Jupyter notebook is how easy it is to train and test a neural network.
Now that our data is ready and labeled, we can jump right in and training a simple model in just a few lines of code.
Let’s now import keras and train a simple network:
from keras.models import Sequential
from keras.layers import Dense, Dropout, Activation, Flatten
from keras.optimizers import SGD

model = Sequential()
model.add(Dense(128, activation='relu', input_shape=(50,)))
model.add(Dropout(0.5))
model.add(Dense(128, activation='relu'))
model.add(Dropout(0.5))
model.add(Dense(y1.shape[1], activation='softmax'))
model.compile(optimizer='Adam',
              loss='categorical_crossentropy',
              metrics=['accuracy'])
model.fit(X1, y1, epochs=2000,batch_size=25)
That’s it!
The two slight tricky things here are the input layer, with an input_shape of 50. As a reminder, that’s all of our keypoints from the OpenPose model in X and Y positions.
Finally, we end on a softmax layer, in order to end up with a classifier. For this we pass in the y.shape[1], so we know the number of classes we have.
Finally, our model.fit attempts to train using our input data. Here I’ve done 2000 epochs, and that seems like total overkill. Something around 500 might be more appropriate, as we’re probably overfitting a bit. Either way, this is something to play with more.
When we run this, we start to see the accuracy go up. If you don’t, double check that your labels have been consistently shuffled with your dataset, and that you’ve set your numbers to be between 0 and 1.
Finally, we can save and test our trained model using a sample dataset. The way you save is simple enough:
model.save('data/dab-tpose-other.h5') # save our model as h5


# in our other code, or inline, load the model and test against sample dab dataset
import keras
modello = keras.models.load_model('data/dab-tpose-other.h5')
dabDataset = np.load('data/test-dabs.npy')
dabDataset[:,:,0] = dabDataset[:,:,0] / 720 # I think the dimensions are 1280 x 720 ?
dabDataset[:,:,1] = dabDataset[:,:,1] / 1280  # let's see?
dabDataset = dabDataset[:,:,1:]
dabDataset = dabDataset.reshape(len(dabDataset), 50)
modello.predict_classes(dabDataset) # returns array([1, 1, 1, 1, 1, 1])
Glueing Together Our Model and the Lights
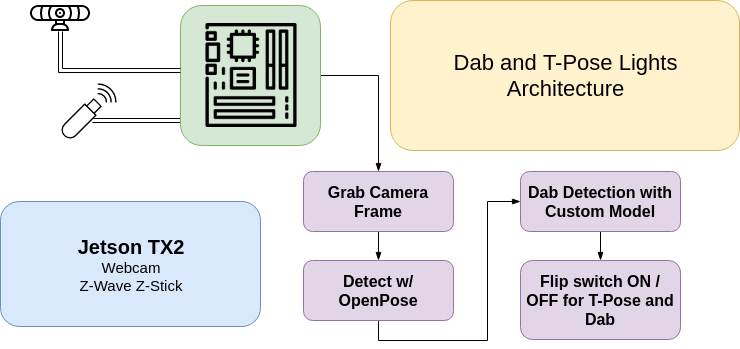
Now that we’ve got a model that can recognize our poses, we just need to hook it up to some way to wirelessly control lights.
In my case, I got a Aeotec Z-Stick to send Z-Wave commands, along with two GE Z-Wave outdoor switches. The USB stick is plugged into an NVIDIA TX2, but a Jetson Nano could work just as well, albeit at a lower resolution that 1280x720 that I had in my example application.
With the Z-Stick plugged into the ARM device, you first have to get the switches on to the Z-Wave network. That’s usually done by some combination of pressing buttons on the USB stick and light switches. Once that’s done, they should all remember one another through power cycles.
Our code doesn’t get much more complicated, it’s just our training environment basically, with an extra step. We now add keras to the import, and run inference on the cleaned data:
import cv2
import pyopenpose as op
from imutils import translate, rotate, resize

import openzwave
from openzwave.option import ZWaveOption
from openzwave.network import ZWaveNetwork

# make sure these commands get flushed by doing them first, then loading tensorflow...
# tensorflow should take enough time to start for these commands to flush
options = ZWaveOption('/dev/ttyACM0')
options.lock()

network = ZWaveNetwork(options)

import time
import numpy as np
np.random.seed(1337)

import tensorflow as tf

# make sure tensorflow doesn't take up all the gpu memory
conf = tf.ConfigProto()
conf.gpu_options.allow_growth=True
session = tf.Session(config=conf)

import keras

# Custom Params (refer to include/openpose/flags.hpp for more parameters)
params = dict()
params["model_folder"] = "../../models/"

# built in TX2 video capture source
vs = cv2.VideoCapture("nvarguscamerasrc ! video/x-raw(memory:NVMM), width=(int)1280, height=(int)720,format=(string)NV12, framerate=(fraction)24/1 ! nvvidconv flip-method=0 ! video/x-raw, format=(string)BGRx ! videoconvert ! video/x-raw, format=(string)BGR ! appsink")

tposer = keras.models.load_model('dab-tpose-other.h5')

# Starting OpenPose
opWrapper = op.WrapperPython()
opWrapper.configure(params)
opWrapper.start()

datum = op.Datum()
np.set_printoptions(precision=4)

fps_time = 0

DAB = 1
TPOSE = 2
OTHER = 0

LIGHTS = 0

bounced = time.time()
debounce = 3 # wait 3 seconds before allowing another command

while True:
    ret_val, frame = vs.read()

    datum.cvInputData = frame
    opWrapper.emplaceAndPop([datum])

    # need to be able to see what's going on
    image = datum.cvOutputData
    cv2.putText(image,
                "FPS: %f" % (1.0 / (time.time() - fps_time)),
                (10, 20),  cv2.FONT_HERSHEY_SIMPLEX, 0.5,
                (0, 255, 0), 2)

    cv2.imshow("Openpose", image)

    if datum.poseKeypoints.any():
        first_input = datum.poseKeypoints
        try:
            first_input[:,:,0] = first_input[:,:,0] / 720
            first_input[:,:,1] = first_input[:,:,1] / 1280
            first_input = first_input[:,:,1:]
            first_input = first_input.reshape(len(datum.poseKeypoints), 50)
        except:
            continue

        output = tposer.predict_classes(first_input)
        for j in output:
            if j == 1:
                print("dab detected")
                if LIGHTS == 0 or (time.time() - bounced) < debounce:
                    continue
                for node in network.nodes:
                    for val in network.nodes[node].get_switches():
                        network.nodes[node].set_switch(val, False)
                LIGHTS = 0
                bounced = time.time()
            elif j == 2:
                print("tpose detected")
                if LIGHTS == 1 or (time.time() - bounced) < debounce:
                    continue
                for node in network.nodes:
                    for val in network.nodes[node].get_switches():
                        network.nodes[node].set_switch(val, True)
                LIGHTS = 1
                bounced = time.time()

    fps_time = time.time()

    # quit with a q keypress, b or m to save data
    key = cv2.waitKey(1) & 0xFF
    if key == ord("q"):
        break

# clean up after yourself
vs.release()
cv2.destroyAllWindows()
With this, we’re done!
We’ve successfully trained a neural network to detect Dabs and T-Poses, and then used it to make interactive lights that work when you dance.
Nice!
Where to go from here
All of the code, models, and training data are freely available on Github.
I encourage you to try playing around in the Jupyter notebook in particular. I had a bug I couldn’t quite figure out with my notebook, where my original X and y labels don’t appear to be labeled properly. Feel free to open a PR if you find the fix.
Otherwise, the base level of the system we’ve built today can be used to start training poses for many types of choreography. Although my frames per second was rather low, we can begin to build out a dataset of dance moves, and a neural network that’s aware of the different types.
Finally, if you’ve enjoyed this post, and would like to see more, I encourage you to subscribe to my mailing list so you’re notified when new posts like this go up.
I also wrote a book for people who are just getting started with programming. I’d love it if you check it out. :)
