Designing A Deep Learning Birding Camera Platform
Over the past few months, I’ve been working on a robotic platform to detect and interact with birds.
It uses a deep learning model called YOLO v2, running on NVIDIA’s embedded deep learning platform Jetson to detect when birds land in front of a webcam. Once detected, my deep learning camera records videos of the birds, and spawns off a web request to a Raspberry Pi over Wifi.
It’s inspired by the insane intelligence of crows, and aims to eventually be a platform for exploring crow intelligence via robotics and games.
In the meantime, it’s a system to automatically identify birds, take actions, and record videos of them.
The plan is to use these videos as data to train a better bird inference model.
Today I’d like to talk a bit about the design process (so far!) in building a deep learning bird camera.
First, Start with the most basic Proof of Concept
My first approach was to attach a webcam to a tripod, and connect that directly to my NVIDIA Jetson TX1 dev board.
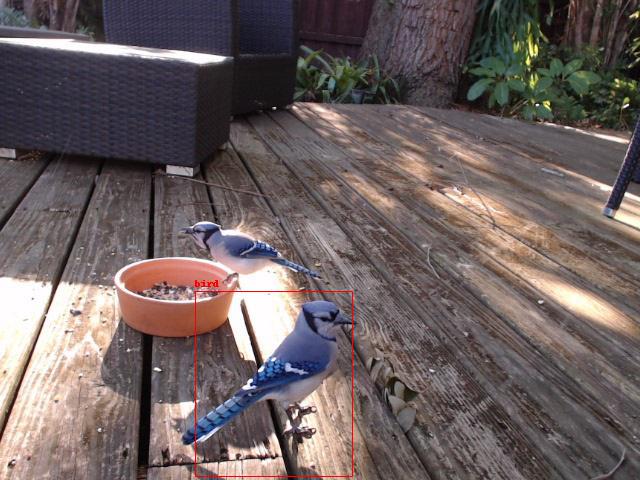
I then ran a YOLO v2 model on the images from the webcam, and see if I could detect a bird. If the model detected a bird in frame, I’d save that image out to disk.
Using this approach, I wanted to first see if I could get birds in my back yard, and if I could actually take a photo once a bird had been detected.
And after putting bird food out for a week, I had zero luck. I couldn’t get a single bird into my backyard.
Eventually, I read that multiple sources of bird food is ideal, along with a bowl for water. So I put out two food sources and a bowl of water, and by the next day I’d had birds detected on my camera! Maybe this thing would work!
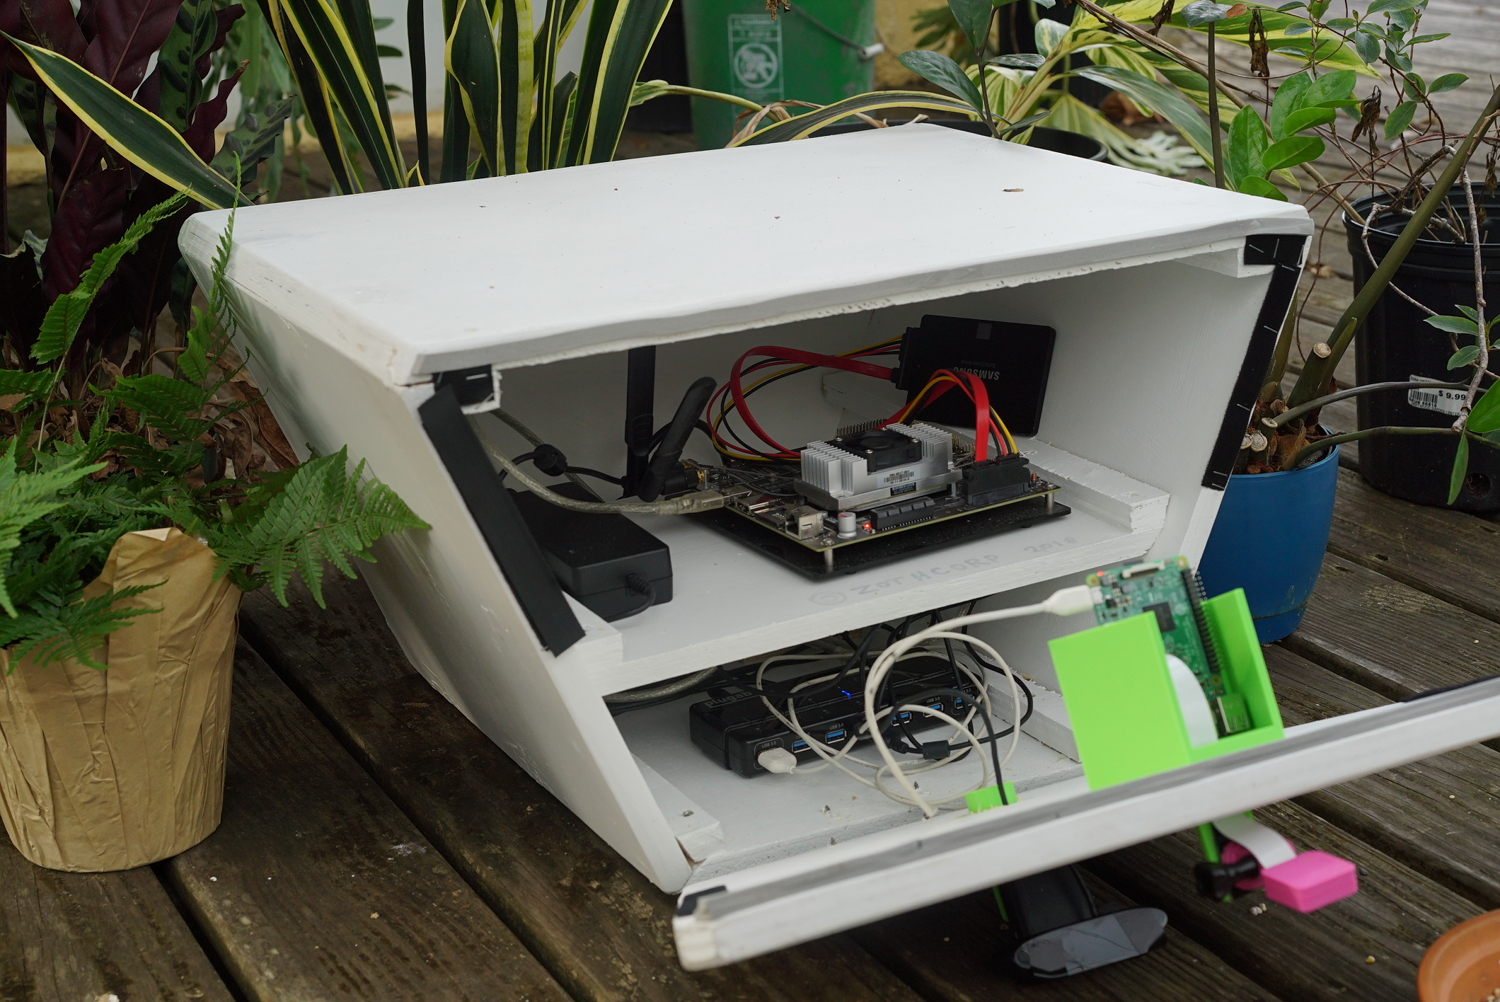
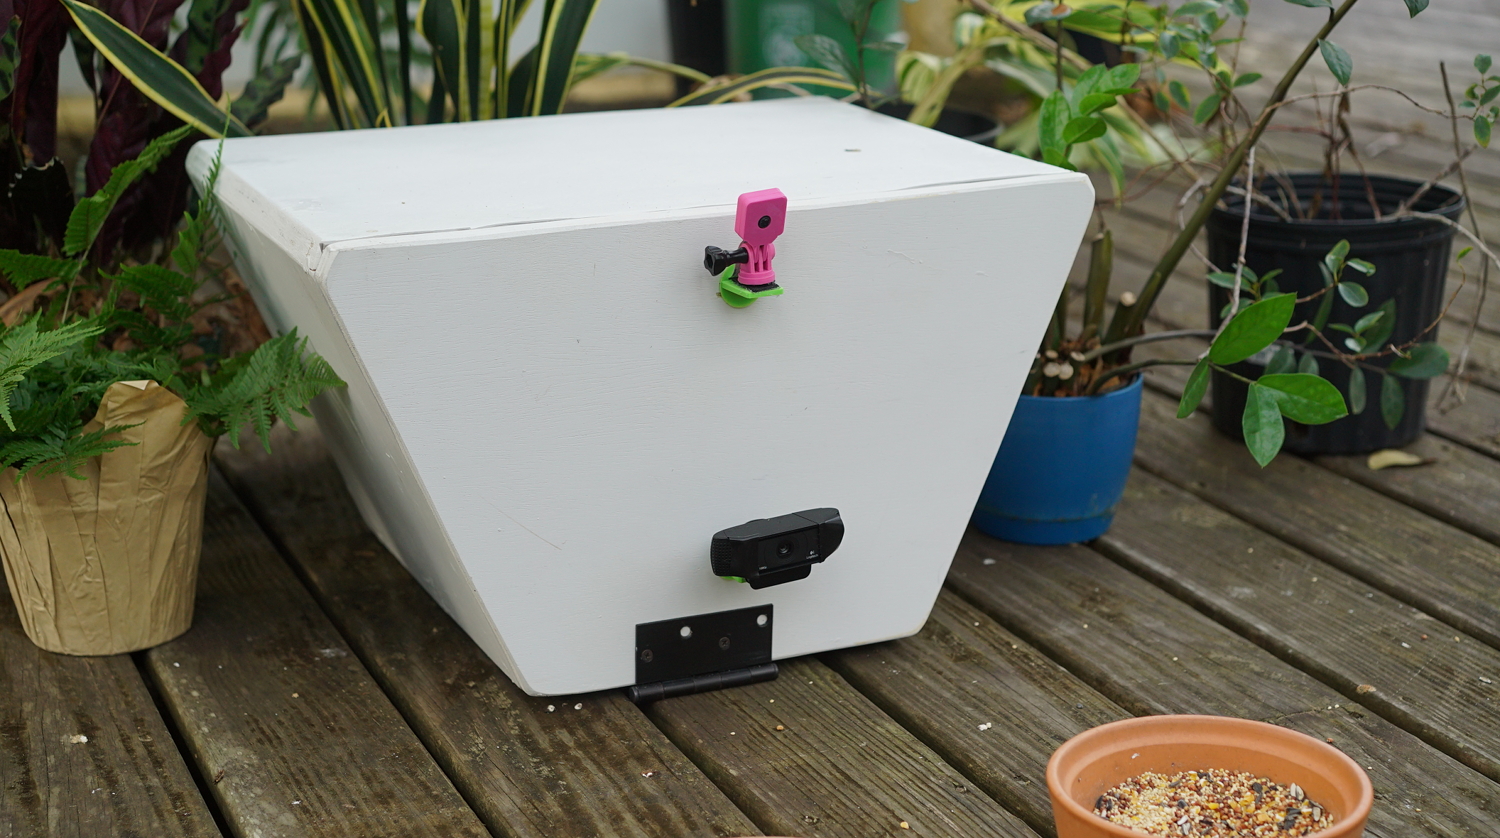
Building the Housing for Components
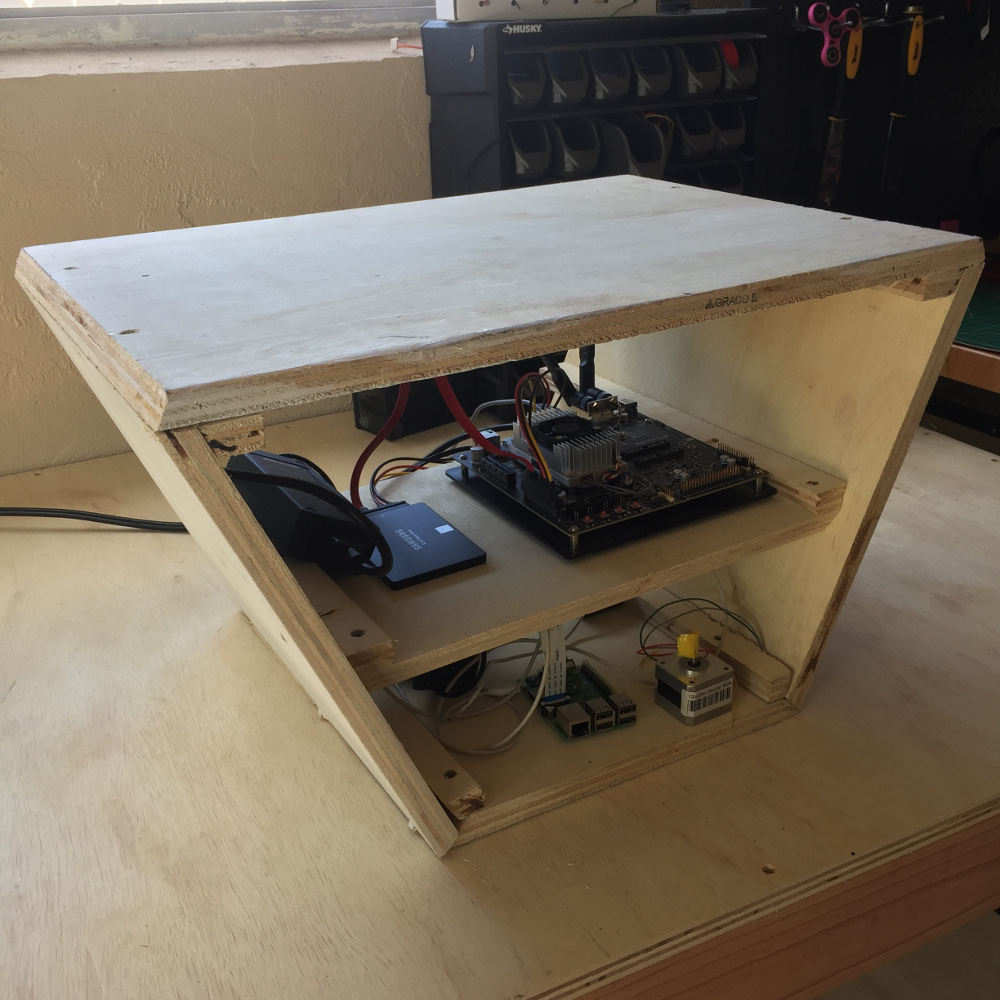
Of course, leaving a TX1 outside exposed to the elements wouldn’t work longer term. So I needed to build a place to keep and protect the electronic components from the wild.
Eventually, I decided on building a shell out of plywood.
As an aside, I’ve got a Prusa i3 MK2 3D printer, and it’s truly great. I can design prints, send them to the printer, and have them all just work. Fast easy desktop 3D printing has (silently) arrived.
So why not build the box housing all the components using the 3D printer?
I wanted at least a little time away from the computer in this project, and I wanted a rapidly expandable platform. So I built a plywood box, out of 3/4” painted plywood. T
The idea is that I’ll 3D print the components that get mounted on to the box itself.
In the meantime, I’ve settled on drilling 1” holes in my box, and designing 3D printable components around these 1” holes.
So far, I’ve built a webcam camera mount (attached via velcro and hot glue gun), and a Raspberry Pi / Camera module v2 mount.
Ideally, these 1” holes can later be used to remove or add components as the focus of the project shifts. In the meantime, the sensitive electronic components are protected.
Planning a Platform for Bird Response

My goal is to take action depending on the specific species of bird in front of the camera.
Depending on the species, I’d like to either dispense food, or try to get the bird to interact with a game.
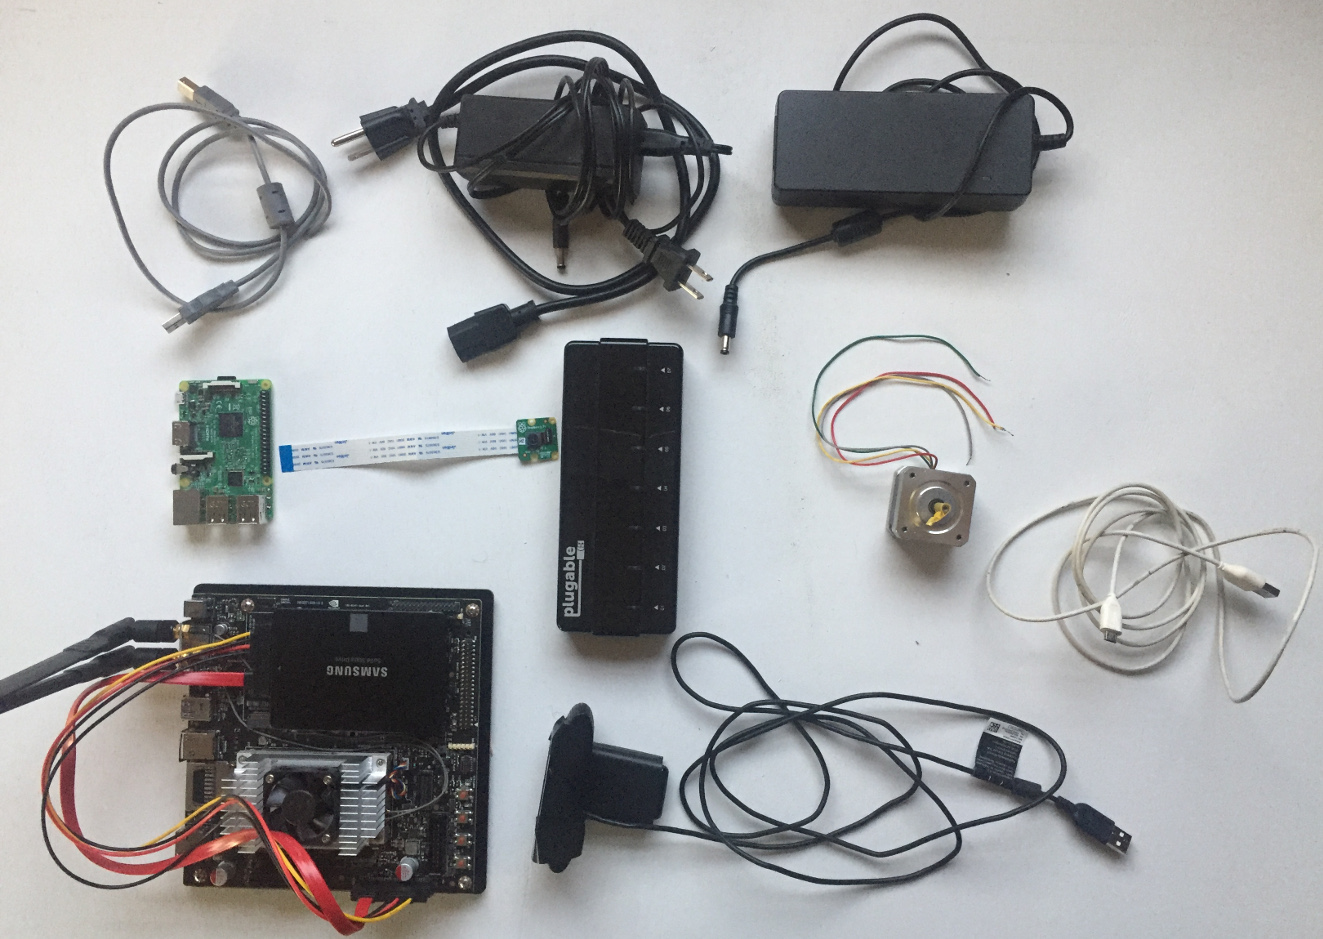
So, I need a platform to manipulate and control electronics, rapidly.
Now, I’ve got enough electronics experience to know that I can make magic smoke come out of anything when I least expect it.
Ideally, I’d have something a bit more disposable than the NVIDIA TX1 hooked up to the electronic components I “design”.
So the next step was making sure Wifi over the Raspberry Pi could work at the distances I’d need for prototyping.
This meant building an API to call the webcam, and ended up becoming a blog post here.
With this in hand, I turned my attention to the box the components would go in themselves.
Putting All the Components Together
With everything else in place, the final thing was to put everything together, and to get the Python inference scripts running. With this, I can save out image sequences, along with 8 megapixel still images of the birds when they’re detected.
The code currently keeps a running buffer of the 30 previous frames as a Numpy array.
Upon bird detection, these 30 frames are written to disk while a new thread captures the next 240 frames.
Finally, a web request is spawned to capture an 8 megapixel photo from the Raspberry Pi:
from darkflow.net.build import TFNet
import cv2

from imutils.video import VideoStream
from imutils import resize

import numpy as np

import os
import threading
import time

import subprocess

vs = VideoStream(resolution=(1280,720), framerate=30)
vs.stream.stream.set(3, 1280)
vs.stream.stream.set(4, 720)

theCam = vs.start()

options = {"model": "cfg/tiny-yolo-voc.cfg", "load": "bin/tiny-yolo-voc.weights", "threshold": 0.1, "gpu": 0.2}

tfnet = TFNet(options)

beforeFrames = 30
afterFrames = 240

# skip frames, we'll check n/30 times per second for bird
skipFrames = 10

# label to try detecting
detectLabel = 'bird'

birdDetected = False

birdFrames = 0

birdsSeen = 0

frame = theCam.read()
#frame = resize(frame, width=512)


theBuffer = np.zeros((frame.shape[0], frame.shape[1], frame.shape[2], beforeFrames), dtype='uint8')

# prefill buffer with frames
def prefillBuffer():
    for i in range(beforeFrames):
        frame = theCam.read()
        #frame = resize(frame, width=512)
        theBuffer[:,:,:,i] = frame

def getHighRes(detectLabel, birdsSeen):
    # gets a high res image from raspberry pi camera v2 server
    # https://github.com/burningion/poor-mans-deep-learning-camera
    # (optional!)
    return subprocess.Popen(['wget', '-O', '%s%i/portrait.jpg' % (detectLabel, birdsSeen), 'http://192.168.1.13:5000/image.jpg'])


prefillBuffer()

currentFrame = 0

def getFramesAfterDetection(fileName, frameBegin, frameLength):
    for i in range(frameLength):
        frame = theCam.read()
        #frame = resize(frame, width=512)
        cv2.imwrite('%s%i/%05d.jpg' % (detectLabel, fileName, frameBegin + i), frame)
        # add this sleep as a hack so we don't write the same frame
        # more than once. the tx1 can write faster than 30 fps to disk
        # on my ssd
        time.sleep(.01)

    print('getframes thread finished')

while True:
    # this is the numpy implementation of our circular buffer
    theBuffer = np.roll(theBuffer, -1, axis=3)
    frame = theCam.read()
    #frame = resize(frame, width=512)

    theBuffer[:,:,:,-1] = frame

    if not birdDetected:
        currentFrame += 1
        if currentFrame % skipFrames == 0 and currentFrame > 0:
            frame = resize(frame, width=512)
            result = tfnet.return_predict(frame)
            for detection in result:
                if detection['label'] == detectLabel:
                    birdDetected = True
                    birdsSeen += 1
                    print("%s seen!" % detectLabel)
                    if not os.path.exists('%s%i' % (detectLabel, birdsSeen)):
                        os.makedirs('%s%i' % (detectLabel, birdsSeen))

                    # spawn a new thread to start capturing directly from webcam while we save preroll
                    afterT = threading.Thread(target=getFramesAfterDetection, args=(birdsSeen, beforeFrames, afterFrames))
                    afterT.start()

                    # save prebuffer to disk on main thread
                    for i in range(beforeFrames):
                        birdFrames += 1
                        print('writing preframes')
                        cv2.imwrite('%s%i/%05d.jpg' % (detectLabel, birdsSeen, i), theBuffer[:,:,:,i])
                    currentFrame = 0

                    print("preframes %i written" % birdFrames)
                    birdDetected = False
                    birdFrames = 0
                    getHighRes(detectLabel, birdsSeen)
                    while afterT.is_alive():
                        time.sleep(0)
                    print("done with thread")
                    prefillBuffer()

                    break


theCam.stop()
All the code is at Github, along with STLs for the camera mounts, direct from Blender.
If you plan on printing the STL’s, I recommend scaling them to 41% of their size. This way, they fit pretty perfectly in the 1” predrilled holes.
(I couldn’t get Blender’s units to translate into millimeters directly. If you know how to do that, please let me know on Twitter!)
Next Steps
If you’re interested in the deep learning bird camera and want to follow along, please subscribe to my mailing list. I’ll be keeping that updated with progress, as I add robotic components and interactivity for the birds.
Besides this, I’ll be presenting on the deep learning bird camera at this year’s Pycon in Ohio. I’d love to meet you and chat about deep learning and birds, or anything else really.
Finally, feel free to create pull requests or add features to any of the repos involving the deep learning camera. I welcome any contributions or help!
