Build an Instagram “Pin” Effect in Python with Dlib
In today’s post, we’ll build an Instagram “Pin” effect in Python, where an image is made to stay in specific position while the camera moves around it.
This pin effect is now much less impressive now that Apple’s ARKit has become commonplace, but working with a simple interface like Dlib’s correlation tracker gives us a great starting point without needing sensor data like in the iPhone.
So today we’ll build a tool for creating videos with pinned images in them in Python.
Along the way, we’ll build an interactive environment to test candidate positions for our correlation trackers, allowing us to preview just how well our places will be tracked.
Correlation Tracking vs Augmented Reality
ARKit from Apple uses sensor data from the iPhone in order to keep track of the phone’s position in space, along with where elements are place.
Dlib’s correlation tracker implements a version of this paper from 2014. It uses just the image data, and keeps track of changes in scale and position based upon where a selected rectangle is in an image sequence.
The correlation tracker isn’t nearly as robust as Apple’s ARKit implementation, and it can’t keep track of things that leave the field of view on it’s own. (If you want to do that, you’ll need to run another detector to see if your object is still in frame.) Still, it’s a great starting point for keeping track of regions, as they move through an image sequence or video.
See the below video for more examples of how well Dlib’s correlation tracker works:
Implementing A Basic Correlation Tracker
There’s a perfect example straight from Dlib, which uses just a box to do region tracking.
Start with a beginning image, and create a box around what you want to track. Call the update tracking on each new frame, and you should have a box that more or less follows your object across the screen.
You can see the full code in the Dlib repo, but the relevant details are below:
import os
import glob

import dlib

# Path to the video frames
video_folder = os.path.join("..", "examples", "video_frames")

# Create the correlation tracker - the object needs to be initialized
# before it can be used
tracker = dlib.correlation_tracker()

win = dlib.image_window()
# We will track the frames as we load them off of disk
for k, f in enumerate(sorted(glob.glob(os.path.join(video_folder, "*.jpg")))):
    print("Processing Frame {}".format(k))
    img = dlib.load_rgb_image(f)

    # We need to initialize the tracker on the first frame
    if k == 0:
        # Start a track on the juice box. If you look at the first frame you
        # will see that the juice box is contained within the bounding
        # box (74, 67, 112, 153).
        tracker.start_track(img, dlib.rectangle(74, 67, 112, 153))
    else:
        # Else we just attempt to track from the previous frame
        tracker.update(img)

    win.clear_overlay()
    win.set_image(img)
    win.add_overlay(tracker.get_position())
    dlib.hit_enter_to_continue()
Our tracker is created with a call to correlation_tracker, and we initialize it with a start_track function that gets sent a numpy array of our image in RGB. We then also pass in our rectangle, in x1, y1, x2, y2 format.
With this, we then call update on our tracker object with every new frame. At any point, we can get the coordinates of the current frame by calling get_position.
Building an Environment to Test Correlation Trackers
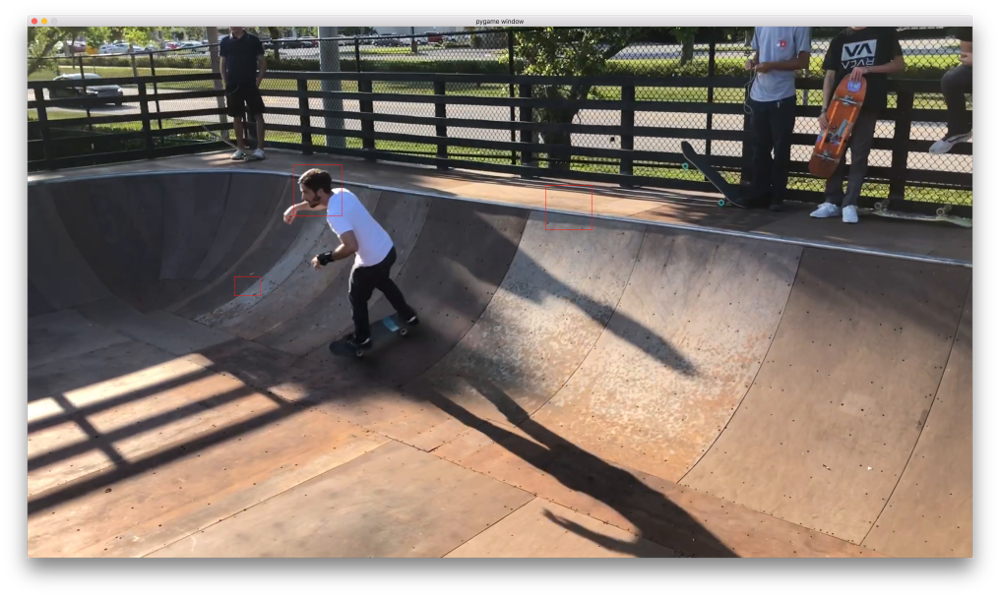
Having to figure out coordinates for our tracker manually isn’t going to be a very good experience. It takes too long to run through our image and see whether or not our tracking region is good enough for us to use.
So we can build a quick prototyping environment using Pygame, and get something interactive up and running. It’ll use the click and drag from the mouse to create new regions for tracking, and will step through our frames by pressing n on the keyboard.
If we want to delete the last created tracking region, we just press z. Finally, in order to save our trackers and where they begin, we’ll export a JSON file with our positions whenever the user presses s.
Here’s the full code, quickly hacked together to get an environment to play around in. The meaty bits to make the trackers work are:
def draw_rect(screen, color, start, end, width=1):
    pygame.draw.rect(screen,
                     color,
                     (start[0], start[1], end[0] - start[0], end[1] - start[1]),
                     width)
    return

def get_tracker(nowFrame, start, end):
    tracker = {'start': start, 'end': end, 'currentStart': start, 'currentEnd': end, 'startFrame': nowFrame, 'endFrame': False}

    img = io.imread(inputDirectory + '%05d.png' % nowFrame)
    tracker['tracker'] = dlib.correlation_tracker()
    tracker['tracker'].start_track(img, dlib.rectangle(tracker['start'][0],
                                                       tracker['start'][1],
                                                       tracker['end'][0],
                                                       tracker['end'][1]))
    print("tracker added at start: %s end: %s and frame: % i" % (tracker['start'], tracker['end'], nowFrame))
    return tracker

def get_next_frame(trackers, startFrame, nowFrame):
    nowFrame += 1
    print('current frame: %i' % nowFrame)
    img = io.imread(inputDirectory + '%05d.png' % nowFrame)
    for tracker in trackers:
        if tracker['startFrame'] > nowFrame:
            continue
        elif tracker['startFrame'] == nowFrame:
            trackie = get_tracker(nowFrame, tracker['start'], tracker['end'])
            tracker['tracker'] = trackie['tracker']
            tracker['currentStart'] = tracker['start']
            tracker['currentEnd'] = tracker['end']
        else:
            tracker['tracker'].update(img)
            pos = tracker['tracker'].get_position()
            tracker['currentStart'] = [int(pos.left()), int(pos.top())]
            tracker['currentEnd'] = [int(pos.right()), int(pos.bottom())]
    return trackers, nowFrame

def save_trackers(trackers):
    # delete tracker objects
    for tracker in trackers:
        del tracker['tracker']
    with open('trackers.json', 'w') as out:
        json.dump(trackers, out, indent=4)
    print('wrote trackers to disk')
    return

def load_trackers(filename):
    with open(filename) as json_file:
        trackers = json.load(json_file)
        for tracker in trackers:
            tracker['currentStart'] = tracker['start']
            tracker['currentEnd'] = tracker['end']
        return trackers
With these functions we can see that our Pygame program uses a dictionary to store start and end positions for the tracking boxes, along with their startFrame. With this, we can step through each of the frames, and see if our selected regions lose the area we want to track or not.
Adding in Our Images
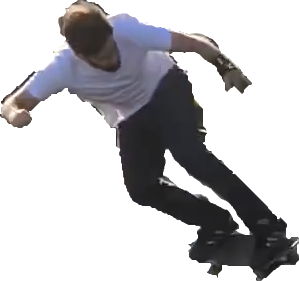
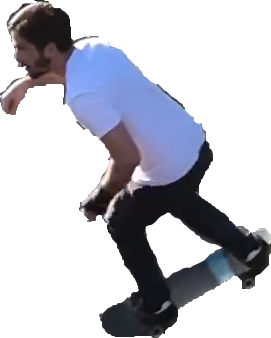
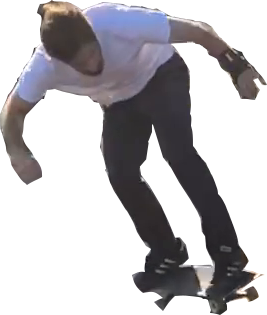
In the video at the start of the blog post, you can see that there are cutouts of me skating later in the video that sync up to where I’ll eventually be.
If you use something like Mask R-CNN, you should be able to automatically extract future positions, and add them to the region tracker.
For this implementation, to keep things simple I opted to manually trim out transparent PNGs for each of the frames I wanted to track to.
Finally, I found an x and y offset for each of the extracted PNGs to match.
In this round, I didn’t implement scaling, even though our correlation tracker is capable of handling scaling in our source region. I figured getting a first, basic implementation across the different pieces was a good start instead.
Where to Go From Here
As I’ve said, there are really two places to go with the current code.
You can look at the code for the sketch at my Github, and see how I’ve adapted the correlation trackers exported to an example input video.
Of course, a better solution would be to hook it up to something like my example gif generator using Mask R-CNN in order to get our frames to catch up to. This would eliminate the tedious task of masking off our images.
Feel free to make a pull request for improvements to the correlation tracker playground. It’s just a first naive implementation, but there’s plenty of room to make it a better creative tool.
If you’re still learning Python and Pygame, or you want a visual introduction to programming, check out my book, Make Art with Python. The first three chapters are free.
Finally, feel free to share this post with your friends. It helps me to continue making these sort of tutorials.
