Building a Self Contained Deep Learning Camera in Python with NVIDIA Jetson
In my last post, we build a Raspberry Pi based deep learning camera to detect when birds fly into a bird feeder.
Today, we’ll build a self-contained deep learning camera to detect birds in the wild.
My goal in this series of posts is to build an open platform for exploring crow intelligence. Eventually, I’d like to identify individual crows in the wild, and give them the opportunity to pass a series of tests.
But for now, I’m building the first steps to get to the interactive platform.
And today, that means detecting birds and recording videos on the device when one lands at my feeder.
Inference and Response on A Single Deep Learning Platform
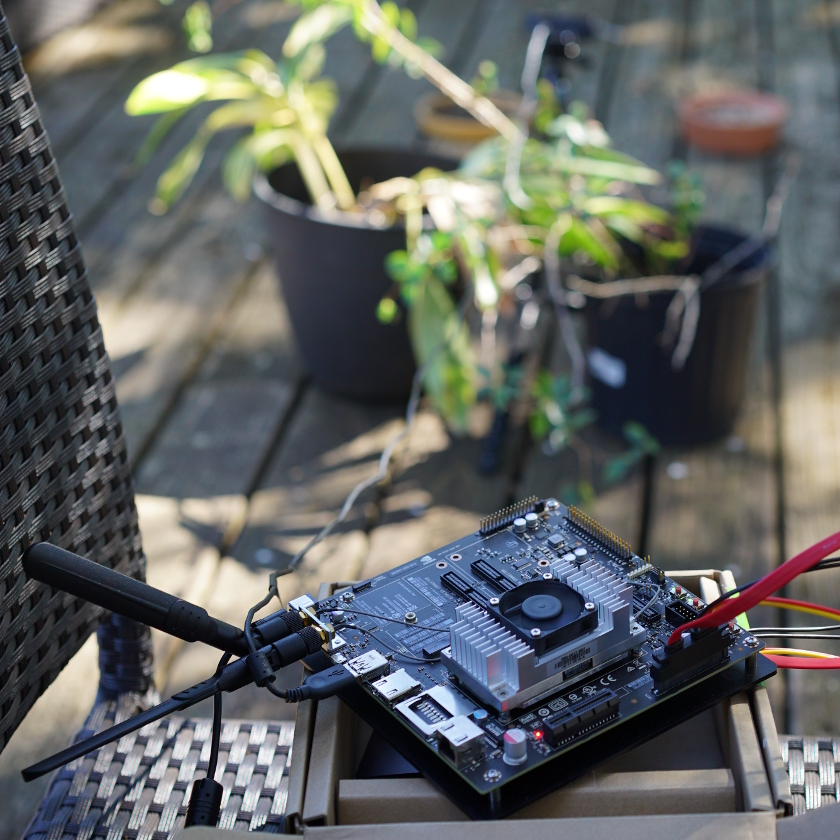
I’ve chosen the NVIDIA TX1 as my development platform for its relative computational power, and its ability to interact with other electronic components (like servos, temperature sensors, etc.) via it’s GPIOs, I2C, and SPI.
The Jetson dev kit is an embedded deep learning platform with an onboard camera, 256 CUDA Cores, and 1 TFLOP of computing power. It’s built to do inference on on device, and the dev board retails for around $500.
It’s the perfect platform to begin prototyping deep learning camera applications.
Because of the relative computational power of the TX1, I can run an inference directly on the device. This gives me the ability to take action upon detecting a bird in the camera frame.
Right now the feeder consists of a plate on the ground with food. And my video camera isn’t actually the video camera included on the board from NVIDIA. Instead, it’s an external webcam, the same I used in my last post.
With this external camera, I can run detection at around 10 frames per second at a resolution of 512 frames per second.
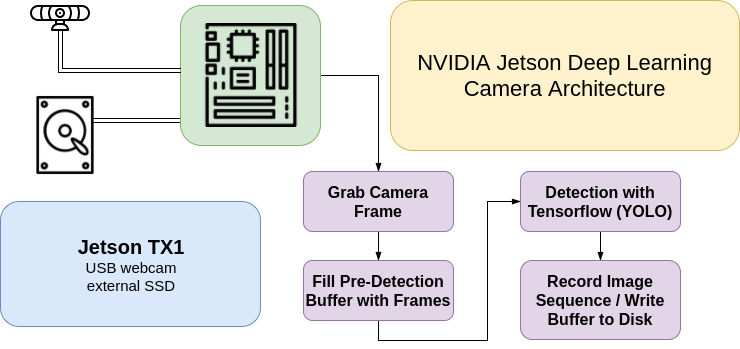
Architecture for Inference on the Jetson
There are 16GB of onboard space built into the TX1, but I want plenty of space to record image streams and videos of the birds.
Adding an external SSD allows me to store plenty of image sequences, without having to worry about needing to delete things later.
I use Python3, along with the OpenCV 3, and Darkflow, as I did my Poor Man’s Deep Learning Camera post.
One thing to be aware of, there’s also a more recent version of the Jetson platform, called the TX2. It’s got double the disk space and memory, and also adds support for CAN.
Regardless of whether you choose a TX1 or TX2, you’ll need access to a Linux machine to flash the Jetson board to the latest version. I used Ubuntu 16.04 to flash my device, and even though it’s not officially supported, everything ran without a hitch.
If you end up using an SSD, I used this adapter to connect directly to the dev board. It supplies SATA data and power, and is the only cable you’ll need.
Finally, setting up OpenCV 3 can be a bit of a pain, regardless of your platform. You can use my fork of the JetsonHacks’ of an OpenCV 3 build script.
Building the Software for Inference
I use OpenCV to read from the attached USB webcam. This allows me to get a NumPy array filled with our current webcam data.
My initial approach was to just record a fixed set of frames, only when a bird is detected.
This approach didn’t really work, because the detection in the default Tiny YOLO model is pretty noisy. It missed a lot of frames with the bird in it, and so my initial videos were very jumpy and missed a lot of frames.
I then tried recording just a set length after detection. This worked well, and gave me great videos, but the YOLO model still doesn’t detect early enough to see the whole bird’s approach and fly away. It was important for me to capture these moments too.
The code for this pre-buffer is easy enough, and is actually a good implementation of a circular buffer in Python.
Here’s what it looks like:
import numpy as np
from imutils.video import VideoStream
from imutils import resize

theCam = VideoStream().start()


# 4 seconds at 30 fps
beforeFrames = 120

# resize the input image to be smaller for inference
frame = theCam.read()
frame = resize(frame, width=512)

# fill the buffer with the resized image shape, and the number of frames
theBuffer = np.zeros((frame.shape[0], frame.shape[1], frame.shape[2], beforeFrames), dtype='uint8')

# prefill buffer with frames
def prefillBuffer():
    for i in range(beforeFrames):
        frame = theCam.read()
        frame = resize(frame, width=512)
        theBuffer[:,:,:,i] = frame

prefillBuffer()

# in a loop, roll the last element to be the first element
# and then replace the first element with the latest frame

while True:
    # this is the numpy implementation of our circular buffer
    theBuffer = np.roll(theBuffer, -1, axis=3)
    frame = theCam.read()
    frame = resize(frame, width=512)

    theBuffer[:,:,:,-1] = frame
    # your inference code goes here...
Detecting Birds and Recording Videos
With the main architecture decided, and the ring buffer written, the remaining code is fairly straightforward. All we need to do is load our Darkflow model, and then loop until we detect a bird.
Once a bird is detected, we create a new thread to continue recording the next few seconds, while the main loop writes the buffer to disk.
Once these image sequences are written to disk, we can then later turn them into videos for viewing.
from darkflow.net.build import TFNet
import cv2

from imutils.video import VideoStream
from imutils import resize

import numpy as np

import os
import threading
import time

theCam = VideoStream().start()

options = {"model": "cfg/tiny-yolo-voc.cfg", "load": "bin/tiny-yolo-voc.weights", "threshold": 0.1, "gpu": 0.2}

tfnet = TFNet(options)

# at 30fps, this is 4 seconds
beforeFrames = 120
afterFrames = 120

# skip frames, we'll check n/30 times per second for bird
skipFrames = 10

# label to try detecting
detectLabel = 'bird'

birdDetected = False

birdFrames = 0

birdsSeen = 0

frame = theCam.read()
frame = resize(frame, width=512)


theBuffer = np.zeros((frame.shape[0], frame.shape[1], frame.shape[2], beforeFrames), dtype='uint8')

# prefill buffer with frames
def prefillBuffer():
    for i in range(beforeFrames):
        frame = theCam.read()
        frame = resize(frame, width=512)
        theBuffer[:,:,:,i] = frame

prefillBuffer()

currentFrame = 0

def getFramesAfterDetection(fileName, frameBegin, frameLength):
    for i in range(frameLength):
        frame = theCam.read()
        frame = resize(frame, width=512)
        cv2.imwrite('%s%i/%05d.jpg' % (detectLabel, fileName, frameBegin + i), frame)
        # add this sleep as a hack so we don't write the same frame
        # more than once. the tx1 can write faster than 30 fps to disk
        # on my ssd
        time.sleep(.03)

    print('getframes thread finished')

while True:
    # this is the numpy implementation of our circular buffer
    theBuffer = np.roll(theBuffer, -1, axis=3)
    frame = theCam.read()
    frame = resize(frame, width=512)

    theBuffer[:,:,:,-1] = frame

    if not birdDetected:
        currentFrame += 1
        if currentFrame % skipFrames == 0 and currentFrame > 0:
            result = tfnet.return_predict(frame)
            for detection in result:
                if detection['label'] == detectLabel:
                    birdDetected = True
                    birdsSeen += 1
                    print("%s seen!" % detectLabel)
                    if not os.path.exists('%s%i' % (detectLabel, birdsSeen)):
                        os.makedirs('%s%i' % (detectLabel, birdsSeen))

                    # spawn a new thread to start capturing directly from webcam while we save preroll
                    afterT = threading.Thread(target=getFramesAfterDetection, args=(birdsSeen, beforeFrames, afterFrames))
                    afterT.start()

                    # save prebuffer to disk on main thread
                    for i in range(beforeFrames):
                        birdFrames += 1
                        print('writing preframes')
                        cv2.imwrite('%s%i/%05d.jpg' % (detectLabel, birdsSeen, i), theBuffer[:,:,:,i])
                    currentFrame = 0

                    print("preframes %i written" % birdFrames)
                    prefillBuffer()
                    birdDetected = False
                    birdFrames = 0
                    while afterT.is_alive():
                        time.sleep(0)
                    print("done with thread")
                    break


theCam.stop()
One last thing I’d like to point out with the threaded code above, I needed to add a time.sleep(0.03) in order to keep my frame rate down. If I didn’t do this, my video would change times from the before buffer to the after buffer.
Apparently, the TX1 can write to disk faster than 30fps. Impressive!
Changing What Gets Detected And How Long Videos Are
During debugging, I found it useful to change my code to try and detect person, so that I could trigger the code by walking in front of the webcam myself. “person” is one of the labels from the COCO dataset, and anything from that dataset should be something detectable using the YOLO tiny model.
Just change the detectLabel variable in the code to 'person', and you should be on your way.
I did this so I could debug pre and post frames, and try to keep the time in sync between each.
If you want to change your pre or post buffer length, just change the beforeFrames and afterFrames variables.
By default, my webcam shoots at 30fps, and so 120 would be 4 seconds of 30 frames per second. Adjust to match what works best for you.
Where to Go from Here
The code for this post is available at Github, as always.
Thanks again to Darkflow and Darknet for the deep learning models used for detection.
This post is the second part in a set of lessons where I will use deep learning cameras to try and interact with birds.
If you’re interested in following along, I encourage you to subscribe below, or create an account here on Make Art with Python.
Finally, feel free to share this post with your friends. It helps me to continue making these sort of tutorials.
