
10 PRINT in Python 3 with Pygame
10 PRINT is a new book which explores the magical power of a single line of code.
That single line of code ran on the Commodore 64, in 1982. It gave us one of the earliest examples of the power of computers to generate entire worlds.
(Gif from Thomas Winningham)
With just a single incantation:
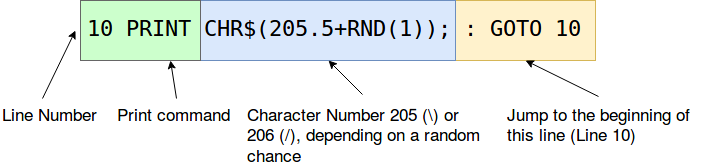
10 PRINT CHR$(205.5+RND(1)); : GOTO 10
Our intrepid user got to watch an entire universe unfold in front of them.
This magic of new possibilities is a great example of what makes programming so exciting. With just one line of code, we can see an entire world, randomly building itself. We see paths and imagine new places with our eyes.
Understanding How 10 PRINT Builds a Universe
10 PRINT was written in the Basic programming language. This means it has a few quirks, looking back at it from our modern languages.
For one, Basic was just a raw terminal you typed your programs into. With each entered, you were writing a specific set of commands to be followed linearly.
First we have the line number, which is used at the end to repeat the line of code infinitely. Most modern programming languages don’t have this idea of GOTO built in, because we’ve tried to abstract away from line numbers, and into more definite modules and functions with names.
Next, we use the CHR$ function, and pass it the number 205.5 + a random value between 0 and 1. All numbers were floating point values on the platform, and rounded down. So this meant our code would generate either the character 205 (\), or 206 (/).
With this, we loop infinitely, generating either a forward slash, or a back slash.
We can do this in Python, of course, in just a single line from the terminal.
As suggested by reddit user WK02, here’s the code to generate 10 PRINT in one line of Python from the shell:
from random import choice; print(''.join(choice(('\\', '/')) for i in range( 10000)))
Rewriting 10 PRINT in Python 3 and Pygame
Unfortunately, writing 10 PRINT in Python and Pygame isn’t really doable in one line.
The code to generate the lines is easy enough, but setting up our window for drawing takes up the majority of our code.
import pygame

import random

# set our screen's width and height
screenWidth, screenHeight = (800, 800)

pygame.init()

pygame.display.set_caption("10 PRINT in Pygame")
screen = pygame.display.set_mode((screenWidth, screenHeight))

running = True

white = (255, 255, 255)
black = (0, 0, 0)

# size of square, in pixels
square = 20

def drawScreen():
    screen.fill(black)
    # Python version of 10 PRINT happens here
    for x in range(0, screenWidth, square):
        for y in range(0, screenHeight, square):
            if random.random() > 0.5:
                pygame.draw.line(screen, white, (x, y), (x + square, y + square))
            else:
                pygame.draw.line(screen, white, (x, y + square), (x + square, y))

while running:
    key = pygame.key.get_pressed()
    # only draw if user presses spacebar
    if key[pygame.K_SPACE]:
        drawScreen()
    # quit if user presses q
    if key[pygame.K_q]:
        exit()
    for event in pygame.event.get():
        if event.type == pygame.QUIT:
            running = False
    # this updates the display
    pygame.display.flip()
The real work of drawing 10 PRINT in our program comes from the following lines:
    for x in range(0, screenWidth, square):
        for y in range(0, screenHeight, square):
            if random.random() > 0.5:
                pygame.draw.line(screen, white, (x, y), (x + square, y + square))
            else:
                pygame.draw.line(screen, white, (x, y + square), (x + square, y))
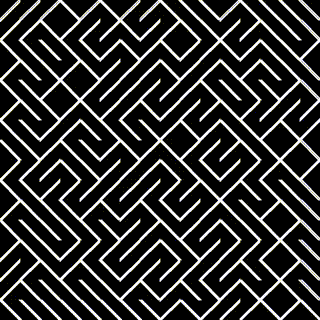
We use the size of the square in an x and y coordinate across the screen using range. If the square size is set to 20, x and y will be 0,20,40,60,80... all the way through to our screenHeight and screenWidth.
Next, we use the random.random() function to generate a number between 0 and 1. If that number is greater than 0.5, we draw a diagonal line of our square size, from the bottom to the top right (/).
If the random.random() number is less than 0.5, we make a diagonal line going from the top left of our square to the bottom right ().
With this, we’ve got our own implementation of the maze effect in Python 3, but none of the scrolling forever.
Coding Challenge: Animating 10 PRINT
If we want to animate our 10 PRINT, we’ll need to start with a static set of line points to manipulate, instead of creating new ones every time the spacebar is pressed.
Something like this might work:
for x in range(0, screenWidth, square):
    for y in range(0, screenHeight, square):
        if random.random() > 0.5:
            lines.append([x, y, x + square, y + square])
        else:
            lines.append([x, y + square, x + square, y])
With this, we’ve got a set of line points we can access and manipulate using our loop.
Try making your own changes to 10 PRINT to make a new sort of animation. If you get stuck, you can check out the code used to make the above gif on Github.
Where to Go From Here
The above code gives you a starting point for manipulating your own interpretation of 10 PRINT. If you get stuck, feel free to look at the Github repository to figure out how to animate it yourself.
Be warned that the code currently writes an image to disk for every step, so you’ll want to comment out that line if you don’t want to save your images.
Feel free to share your images on Twitter or Instagram with the hashtag 10PRINT. I’d love to see what else you can make.
For other references to 10 PRINT, check out the YouTube channel The Coding Train’s interpretation of 10 PRINT done in Processing.js.
Reddit user baltoxydase posted a version of 10 PRINT in one line for Pygame. See if you can do better:
while"p"in globals()or(map(globals().__setitem__,"baltox",map(__import__,["pygame",
"random"])+[globals().__setitem__,lambda:(b.init(),map(l,"d_j",(b.display,(800,)*2,
range)),l("w",d.set_mode(_))),lambda:(l("u",b.key.get_pressed()),u[32]and(l("z",20)
,[(l("v",a.random()>0.5),b.draw.line(w,(255,)*3,(f,y+v*z),(f+z,y+z*(not v))))for f
in j(0,_[0],z)for y in j(0,_[1],z)],d.flip())or u[113]and x(),[e.type==12 and x()
for e in b.event.get()]),exit]),t()):o()
Finally, if you enjoyed this post and would like to see more like it, sign up for my newsletter, or create an account here on Make Art with Python to get access to the first three chapters of my book free.
